
Want to boost or increase your internet speed up to 20%? Here’s how you can do it
Whether it is checking or sending emails, uploading or downloading files and images, watching videos, etc., it is very important to have a fast and blazing internet speed for a stress free experience. Even home, workplace, libraries, schools, airports, hotels and some restaurants have become internet friendly these days. As Internet has now become our preferred medium of everyday communication and the medium of the future, it can be quite frustrating if one is stuck with slow and sluggish internet speed.
To help you out in such a scenario, we provide three simple techniques that will assist in boosting or increasing your internet speed.
Method 1: – Restrict Reservable Bandwidth
Generally, bandwidth is actually the rate at which data travels to and fro from your computer. In other words, bandwidth is the range covered for data transmission between an upper range and lower range. Bandwidth is usually controlled by your Internet Service Provider (ISP). However, there is some reservable bandwidth limit allocated to your system by default for its use. Apparently, 20-30% of internet speed of the total speed of a connection is included in this bandwidth. However, you can now free this unallocated limit bandwidth to experience high-speed internet.
Here’s what you need to do to edit limit reservable bandwidth:
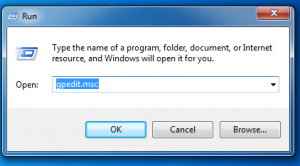
Step 1: Press Windows Key + R combination to open the Run dialog box. Type gpedit.msc in Run dialog box and hit Enter to open the Local Group Policy Editor.
Step 2: Click on Administrative Template folder showing on the left side in the dialog box. Then, choose Network option on the right side of the box. Later, click on Qos Packet Scheduler from the right list under Settings.

Step 3: Look for the file Limit reservable bandwidth. It will show as ‘Not Configured’ status by default. To modify this setting, double click on it.

Step 4: Select Enabled and in the Options section set the bandwidth limit percentage from 20 to 0 and click on Apply followed by OK.

It’s done. You will now have the unallocated reserved bandwidth at your disposal for enjoying high-speed internet experience. Besides, bandwidth reservation, there are many other factors that can cause reduced internet speed such as an obsolete software like antivirus and many more processes running in the background. To stop such processes, open the Task Manager or press ALT+CTRL+DEL and end the running processes to help boost or increase your internet speed.
Method 2: Managing Cache
Caches are the temporarily stored internet data which is used by browsers like Internet explorer, Google Chrome, Mozilla Firefox etc. to open any site faster after visiting any site. This cache gets stored automatically to your computer. Although caches are designed to speed up your internet speed but sometimes it can slow down the internet speed when they exceed beyond the limited size. In that case, we have to clear the caches to speed up the internet.
Follow the steps below to clear cache and increase internet speed:

Step 1: Open Google Chrome and press CTRL+SHIFT+DELETE.
Step 2: Choose Temporary Internet Files, History and Cache data.

Step 3: Click on Delete.

This function will delete all your temporary internet data, history and cache data from your computer, thereby increasing the internet speed of your computer. By clearing history data on a regular basis can keep your computer secure from hacking attacks.
Method 3: Increase Speed using Device Manager
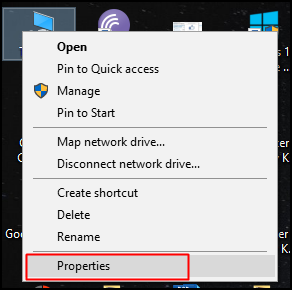
Step 1: First, right click on My Computer and click on Properties.
Step 2: Then, click on Device manager.

Step 3: It will open a new window. Here, you need to expand the Ports.

Step 4: Then, click on Communications Ports and later double click on it.

Step 5: Now, click on Port Settings. Then, change Bit per second to a maximum available and Flow Control to Hardware.

It’s done. All you need to do is save it and restart your computer to enjoy the increased speed up to 20%-30%.
Setting Up Google DNS
In this method, you can change your default ISP provided by DNS to the Google DNS on your Windows computer. This will boost your internet speed by 20-30%, thereby offering high-internet speed while browsing.
Here’s what you need to do:
Step 1: Firstly, go to the Control Panel in your Windows PC and select Network and sharing center.
Step 2: Then, click on Change Adapter Settings.
Step 3: Now, you will see all the networks. Just, choose the network that you want to configure for Google DNS. However, if you want to try out Google’s DNS and want to change Ethernet settings, then simply right-click on Local Area Connection and select Properties.

Step 4: Click on Networking tab and look for This connection uses the following items. Then, choose the option Internet Protocol Version 4 (TCP/IPv4) under it and then click on Properties.


That’s it! You are done. All you have to do is restart your computer to enjoy the increased speed. You can always switch back to the default DNS settings of your ISP, if you don’t like the new settings.
https://techviral.net/boost-increase-internet-speed/
http://www.thewindowsclub.com/configure-reservable-bandwidth-settings-windows


0 comments